Wall Tent Internal Frame Build
Wall Tent Internal Frame Build
I bought a 10ft x 12ft a few years ago and I totally love it. It’s the perfect size for me and one other person - palatial for one person, and really cozy for two people. The one thing that I didn’t like was setting it up. The wood makes it kind of a pain to set up, consumes a lot of space, degrades pretty quickly… Also and internal metal frame would allow some interior stuff to be easier to put up, like a fan, anything that can be magnetized. They’re round too so hooks can easily be placed on them. Lastly, they fit entirely in my truck’s bed flat, without any angling, which should make packing much easier.
I figured I’d record the build process because I know a bunch of people who have the 10x12 Wall Tents also who might also be interested in an internal frame swap. Enjoy.
Part List
Note: Prices obviously change pretty regularly, especially these days. Thus, the prices listed below indicate when I purchased them. Just be aware.
If you already have the Wall Tent, the cost for this is right around $500.
| Item | Units | Unit Price | Cost | Date Purchased | Vendor |
|---|---|---|---|---|---|
| Wall Tent | 1 | $559.95 | $559.95 | 05Apr22 | Blockade Runner |
| Montana Fixed Steel Angle Kits & Angles - 110º Peak & 125º Eaves × 1 | 1 | $226.00 | $226.00 | 23Dec23 | Wall Tent Shop |
| 10ft 1” EMT Conduit | 12 | $17.47 | $209.64 | 31Mar24 | EMT Conduit |
| Pipe Cutter | 1 | $39.47 | $39.47 | 31Mar24 | Pipe Cutter |
| Total Price: | $1035.09 |
The order from Wall Tent Shop included:
- 6 feet “anchors” for the legs.
- A 6ft frame bag. However, I’d highly recommend getting the 7ft bag since some of the poles we cut were just about that long which makes it really difficult to get the bag filled.
Construction
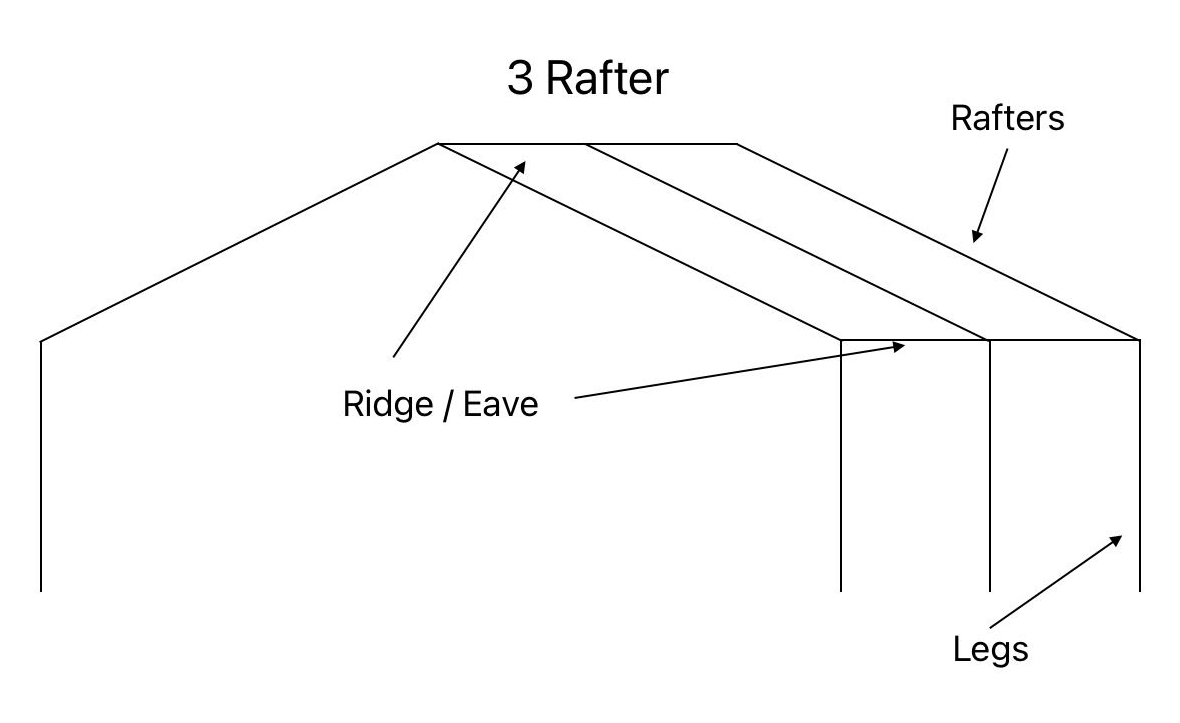
The diagram below shows the terminology and the general configuration of the frame for a 10 x 12’ Wall Tent with the recommended 3 rafters.
Note: 12 pieces of 10ft conduit are required. 18 frame pieces total are required. Rafters and eaves can’t be doubled up on a cut, only a leg and rafter/eave.
- After all materials are obtained, verify cut list measurements against actual tent.
- Ensure the angle fittings match the tent’s internal angles
- Using either the cut list or new measurements, mark conduit pieces and cut down to size using pipe cutter
- If using the cut list from Wall Tent Shop, I recommend adding an inch or so to the rafter and eave measurements just to be certain they’ll fit.
- The measurements for the legs were too long for my liking, so we re-measured them to lower the tent a bit
- De-burr the cut metal ends. File the outsides.
- Assemble frame according to the set up video
- Place canvas and check the fit. If it’s not right, determine which conduit pieces to cut, disassemble, cut, reassemble.
- This took us a few tries since we over-sized the conduit to begin with.
Notes
- The most important thing is to ensure that the angles of the fitting are appropriate. With the Blockade Runner 10 x 12, 110 peak and 125 eaves were perfect. This may differ between different manufacturers and tent sizes.
- The Wall Tent Shop asks for tent measurements upon ordering. These aren’t as critical as the angles, but are a really useful starting point for cutting the conduit. They send a cut list after placing the order based on these measurements.
- Pay attention to the inside of the fittings. The angled fittings lose an inch or so because of the way they are welded. This is also reflected in the cut list they send.
- I advise cutting these a little on the long side just to be sure you can get the fit exactly the way you want it. It’s canvas though, and pretty forgiving, so it’s not a big deal.